

Crochet 101 is a series of crochet tutorials where I will teach you how to complete the basic stitches needed to crochet.
Hi :)
In the Crochet 101 series, we have learned how to:
• Make a slip knot
• Chain stitch
• Slip stitch (part II)
• Single crochet (part II)
• Half double crochet (part II)
• Double crochet (part II)
• Treble crochet (part II)
• Crochet in the back loop (part II)
• Crochet in the front loop (part II)
and
• Switch colors (part II)Just a few more lessons to go and then we get to make a project! Woo hoo!
Lesson 19:

This technique is used when you have finished your project. There are many different ways to do this, but in this tutorial, I will be showing you how I fasten off a project and weave in my ends. Once you become more comfortable with the process, you will develop your own way to do many of the things I have showed you in this series.
Let's get started!
~~~~~~~~~~~~~~~~~~~~~~~~~
First we will learn:

When you finish your project, you will need to fasten off/finish off your project to secure the last stitch so that your project doesn't unravel.
*Your project ready to finish off.
Step 1:

Start off by making the last stitch of your project.

Yarn over.

Pull the yarn through (as if to chain 1).

Measure out about 3 inches of the working yarn and cut.

Take your hook and pull up, pulling the tail all the way through the chain you just made.

Pull the tail to secure the chain, but not too tightly.

You have just finished off your project!
Below is a video I made to show these steps in action. I have slowed the video down so that every step is seen. I have also added music to the video because I filmed this video with my phone and I have no idea how to mute the background while recording. Feel free to mute if piano is not your thing lol
Enjoy!
-------------------------
-------------------------
Now we will learn:

When you finish a project, the last step to finishing is to weave/sew/darn in any yarn tails/ends to make your project look nice and neat.

*Scissors
*Yarn needle
*PLEASE NOTE: As you get more comfortable will this process, you will find what works better for you. You do not have to weave in your ends exactly how I do. I don't think I even do it the same with every project. Just do whatever works for you and whatever hides those ends in your project well.
Step 1:

Lay out your finished project and figure out which end you want to start weaving in first.

Grab your yarn needle...

...and start to thread your yarn end through the eye of the needle.

Pull the yarn through about an inch or so, so that it won't fall out of the needle eye while you are sewing.
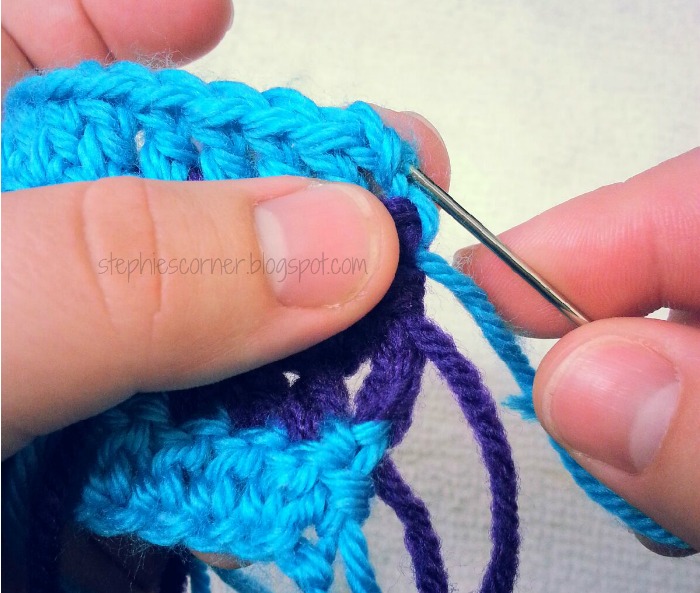
Place your needle into the closest 'bump/loop' from where your tail comes out of the project.


Pull the yarn through. Be sure not to pull too tightly.
Find the next closest 'bump/loop' and insert the needle.


Pull the needle and yarn through.
Repeat:

Find the closest 'bump/loop' and insert the needle.

Pull the yarn through.
Keep doing this, going back and forth, until you feel the yarn tail is nice and secure and won't come loose after washes and use.


On the last pull through, take the yarn out of the needle and give the yarn end a little 'tug'.

Snip the yarn as closely to the work as possible. BE CAREFUL not to accidentally snip your work!!

I like to tug on the stitch a bit to the left...

...and to the right to make sure the end slides back into the stitch where it will be hidden.

The top of the stitch where my yarn was last brought through (can you tell which stitch it came out of?)...

...and the front of the stitches where I weaved in my end.

After all the ends are weaved in, you have a much better looking project :)
You may go on to crochet an *edging around your project, like for a blanket, which will get rid of the uneven or bumpy looking edges. Since this is just practice, we won't worry about it.
(*This will probably end up being a future tutorial.)
Below is a video I made to show these steps in action. I have slowed the video down so that every step is seen. I have also added music to the video because I filmed this video with my phone and I have no idea how to mute the background while recording. Feel free to mute if piano is not your thing lol
Enjoy!
Tomorrow is our last lesson before we learn how to read yarn labels and patterns! Then our first project! I can't wait!!!

Just dropping in to say 'hi' Stephie. You're doing a really great job with these crochet lessons. :)
ReplyDeleteHi!!
ReplyDeleteThank you so much! No one has really let me know if these tutorials are helping or not... I haven't gotten any negative feedback though so that's a good thing! haha
Great tutorial! These were great and I'll be using some steps in my crocheting:)
ReplyDeleteThank you! I'm glad that you find it helpful :)
Delete