

Crochet 101 is a series of crochet tutorials where I will teach you how to complete the basic stitches needed to crochet.
Hi :)

Let's get started!
~~~~~~~~~~~~~~~~~~~~~~~~~
You will need:

*Yarn
*Hook
In this post, I show you where to look for what type of hook you will need for your yarn.
Step 1:

Start with your first row of double crochet stitches.
For this tutorial, I have made 11 double crochets (like in the first double crochet lesson, only I added 1 extra chain to my starting chain [accidentally!]... Still worked the same!).
Step 2:


Yarn over your hook.
Step 3:

Pull the yarn through the loop.

You've just made a chain 1.

Yarn over hook.
Step 5:

Pull the yarn through.

You have just chained 2.

Yarn over.

Pull the yarn through.

You have now chained 3 for the turning chain.
Step 8:

Turn your work in the direction shown by the arrows in the picture above.

Now we're looking at the back of our work.
Step 9:

Yarn over.

Tilt your work toward you so that you are looking at the top of the stitches.

We will be working the first stitch in the 5th chain from the hook (marked with the purple circle in the picture above). The chain 3 that we made before we turned our work counts as our first double crochet.
As I explained in part 2 of the half double crochet lesson, we skip the first stitch directly under the chain (4th chain from the hook) because the chain 3 acts as our first stitch. Since the chain 3 is located directly above the first stitch in the row, there is no need to add a stitch there.

Insert your hook.

Yarn over.

Pull the yarn through.

There are 3 loops on the hook now.
Step 14:

Yarn over.
Step 15:

Pull the yarn through 2 loops.

2 loops left on the hook.
Step 16:

Yarn over.


You have completed your first double crochet of row 2.
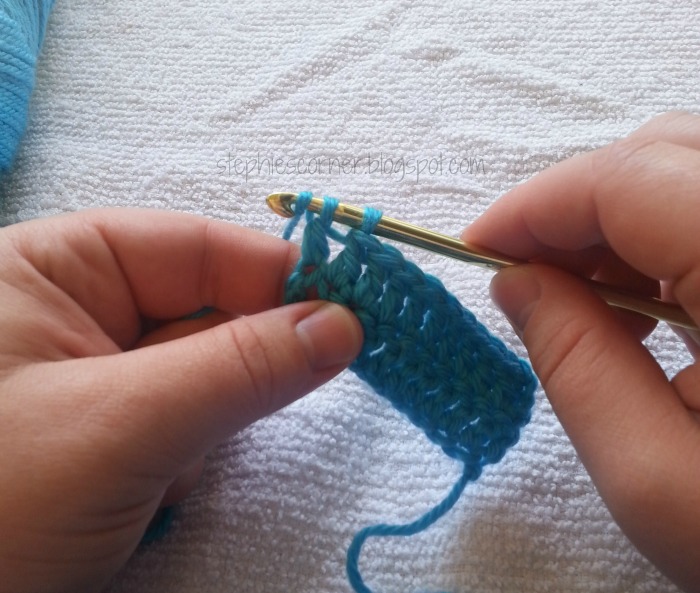
Repeat steps 11-17 across the row until you get to the last stitch (the turning chain from the previous row).

Your work should look like this at this point.

We will be working our last stitch into the top of the turning chain of the previous row (shown with the purple circle in the picture above).

Here I've turned it sideways to show the turning chain loops.

We will be working the last double crochet stitch into the top of the turning chain (marked with the purple circle in the picture above).
For this step, I like to insert my hook through both loops of the turning chain (shown in the purple circle) before moving on to the next row, but a lot of tutorials and YouTube videos show inserting your hook into one loop only... If it is easier for you to insert your hook into only one of the loops of the turning chain, then do that instead. For this tutorial, I will show how to insert the hook into both loops because that is how I crochet.
For this step, I like to insert my hook through both loops of the turning chain (shown in the purple circle) before moving on to the next row, but a lot of tutorials and YouTube videos show inserting your hook into one loop only... If it is easier for you to insert your hook into only one of the loops of the turning chain, then do that instead. For this tutorial, I will show how to insert the hook into both loops because that is how I crochet.

Yarn over.

Insert your hook into both loops of the top of the chain.

Yarn over.

Pull the yarn through. 3 loops on your hook.
Step 22:

Yarn over.

Pull the yarn through 2 loops.

2 loops on the hook.
Yarn over.

Pull through the last 2 loops on the hook...

...and you have just completed row 2 of your double crochets!
Below are 2 videos I made to show these steps in action. I have slowed the videos down so that every step is seen. I have also added music to the video because I filmed these videos with my phone and I have no idea how to mute the background while recording. Feel free to mute if piano is not your thing lol
Enjoy!
This first video shows how to chain, turn your work, and continue on from the first row to the second row with double crochet.
This first video shows how to chain, turn your work, and continue on from the first row to the second row with double crochet.
*PLEASE NOTE: This second video shows how to work into the turning chain after I had already crocheted the second row of double crochet stitches... Every end of row is worked exactly the same. I just wanted to note the extra row of stitches in the video in case anyone was confused about why their second row didn't look the same as in this video.
That's it for this week's Crochet 101 lessons. We will pick back up next Tuesday when we will be learning the treble crochet stitch!
Keep practicing what we've learned! Practice really does make perfect :)
Again, If anyone is having a hard time or has a question, please let me know!
And come back tomorrow for a regularly scheduled post!

No comments:
Post a Comment
I'd love to know what you think :)