

Crochet 101 is a series of crochet tutorials where I will teach you how to complete the basic stitches needed to crochet.
Hi :)
I'm back today with another Crochet 101 lesson... A week late!!
I'm so sorry for the delay; things just were not working in my favor last week, hence no post on Friday (I couldn't believe I missed that day!! Grr!).
So without further delay, let's get things going!
I'm back today with another Crochet 101 lesson... A week late!!
I'm so sorry for the delay; things just were not working in my favor last week, hence no post on Friday (I couldn't believe I missed that day!! Grr!).
So without further delay, let's get things going!
In this series, we have learned how to:
• Make a slip knot
• Chain stitch
• Slip stitch (part II)
• Single crochet (part II)
• Half double crochet (part II)
• Double crochet (part II)
• Treble crochet (part II)
• Crochet in the back loop (part II)
• Crochet in the front loop (part II)
• Switch colors (part II)
• Fasten off and weave in ends
• Begin crochet in the round
• Read yarn labels
and
• Read a written pattern
Do you know what this means?!
Well besides the obvious post title, it means WE ARE STARTING OUR FIRST BEGINNER PROJECT!!
[Can you tell I'm excited?]
Lesson 23:
Lesson 23:

A granny square is a very popular crocheted motif. It is worked in rounds so the work is never turned to work on the other side. There are many variations of the granny square, but today we will be learning how to make the basic granny square.
*This tutorial assumes that you already know: how to begin crochet in the round, how to chain stitch, how to slip stitch, how to double crochet, and how to fasten off and weave in ends.
If you do not know any of these, please click the links listed at the beginning of this post and they will take you to that tutorial.
*NOTE: Because some of you are still new at this and most likely have not mastered reading a written crochet pattern yet, I will be including both the normal pattern directions and the written out directions (those will be in parenthesis). That should save you some time looking at your notes ;)
Today's tutorial will show you how to make a granny square using just 1 color.
(We will learn how to make a multi-colored granny square in tomorrow's tutorial.)
Let's get started!
~~~~~~~~~~~~~~~~~~~~~~~~~
You will need:
*Yarn
*Hook
*Scissors
*Yarn needle
Start with your preferred method of crocheting in the round.
For this tutorial, I have chosen to use the magic loop. If you choose to use one of the other two methods, ignore this step, begin setting up to crochet in the round, and then continue on to the next step.
(For the first method of making a center ring: you will begin with a chain 4, then join [as explained in the tutorial])

~Rnd 1 (Round 1)~
Step 1:
Ch 3 [counts as first dc here and throught]
(Chain 3 [This will count as a double crochet for this round and throughout the pattern; when the rounds start with a ch 3])

Step 2:
2 dc in loop.
(Make 2 double crochets in the center of the ring)

[1 dc...]

[...2 dc]
Step 3:
Ch 2.
(Chain 2)
[This makes the corner of the square and sets up the space where the second round of crochet goes.]

Step 4:
[3dc, ch2] 3 times.
(Make 3 double crochets into the center of the loop, then chain 2. Repeat this sequence a total of 3 times.)


Step 5:
*Move on to Part 2 if you are not using the magic loop starting method.
Part 1
Pull the tail of the yarn to tighten the loop (magic!).

Part 2:
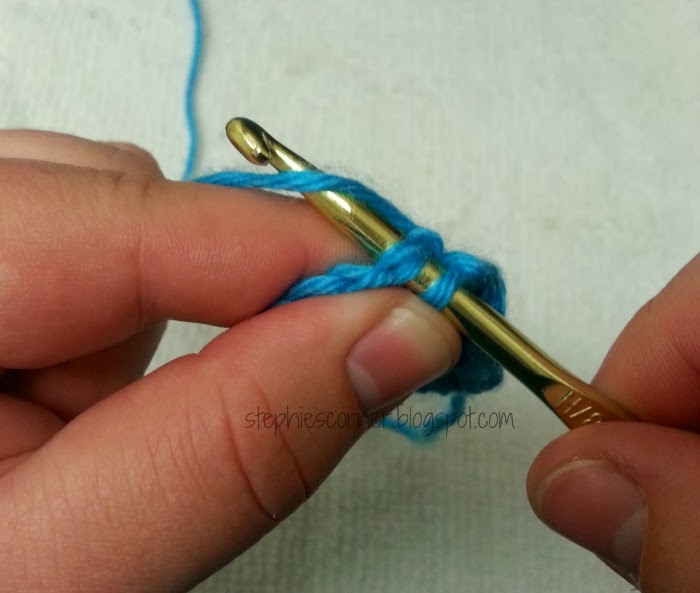
Join in top of ch 3.
(In the top chain of the beginning chain 3, make a slip stitch to join the round.)


[...pull yarn through and complete a slip stitch]
Round 1 is complete!
Now this tutorial goes on to show you how to complete Round 2 of the granny square if you are using just 1 color. Of course you can also fasten off at this point and just make a ton of little squares to join later.
~Rnd 2 (Round 2~
Step 1:
Sl st in ea of next 2 sts and in ch-2 sp.
(Make a slip stitch in the next double crochet, make a slip stitch into the second double crochet, and into the chain 2 space [not the chains])


Step 2:
Ch 3.
(Chain 3.)

Step 3:
[2 dc, ch 2] in ch-2 sp.
(Make 2 double crochet stitches into the chain 2 space and then chain 2.)

Step 4:
[3 dc, ch 2] 2 times in next ch-2 sp.
(Make 3 double crochets, then chain 2, then make 3 more double crochets and chain 2 ALL IN THE CHAIN 2 SPACE.)


Step 5:
Rep 2 more times.
(Repeat step 4 for the next 2 ch-2 sp corners; Make 3 double crochets, then chain 2, then make 3 more double crochets and chain 2 ALL IN THE CHAIN 2 SPACE. Move to the next ch-2 sp and repeat; make 3 double crochets, then chain 2, then make 3 more double crochets and chain 2 [all in the ch-2 sp].)


Step 6:
3 dc, ch 2 in next ch-2 sp.
(Make 3 double crochets, then chain 2 in the next [and last] chain 2 space.)


Step 7:
Join.
(Make a slip stitch to join the round.)


Round 2 is now joined and completed!
*If you want your square to be bigger:
Repeat Round 2: Steps 1-3, then repeat Step 4 for however many chain 2 spaces you have in the round, and finish off the round by doing steps 6-7.
*If you want to stop at Round 2, STOP at Step 6 of Round 2 and follow the steps below:
Step 1:
Thread your yarn needle.

Step 2:
Insert needle under both loops of the top chain of the beginning chain...


Step 3:
Next, insert your needle into the back loop only of the last chain of the chain 2...


Step 4:
Next, turn your square over to the backside and start to weave in the end.


Remember to give the end a slight tug before cutting so that it will slide back into the stitches for good hiding.

And that's it!
A basic granny square; completed!
In this first video, I show all the steps described above for Round 1.
In this second video, I show all the steps described above for Round 2.
(Towards the end, I was having trouble getting my hook into both loops of the top chain to join so I just said forget it and stayed in the one loop... And for some reason I keep messing with the square at the end of the video... sorry for that lol)
There you have it; how to make a granny square. This tutorial shows how to make a one colored granny, but tomorrow we will learn how to switch colors so that we can make our granny square nice and colorful :)
See you back here tomorrow!


 Clicking this image will take you to Bloglovin' where you can click the 'follow' button to follow my blog and be updated in your Bloglovin' feed whenever I post here on the blog.
 Clicking this image will take you to my Instagram profile where you can click the 'follow' button to follow me and be updated in your Instagram feed whenever I post a new picture.
 Clicking this image will take you to my Twitter profile where you can click the 'follow' button to follow me and be updated in your Twitter feed whenever I send a tweet.
 Clicking this image will take you to my Flickr profile where you can 'add' me to your contacts and be updated whenever I post a new picture.
 Clicking this image will take you to my Ravelry profile where you can 'add' me to your friends and can see what projects I'm working on or what patterns I have 'favorite'-d.
 Clicking this image will take you to my Google+ profile where you can 'add' me to one of your circles and be updated whenever I share something or post to my profile.
 Clicking this image will take you to my Pinterest profile where you can 'follow' all of my boards that I pin to, or choose some of my boards to follow to see what I'm pinning.
 Clicking this image will take you to my YouTube profile/channel where you can 'subscribe' and be updated whenever I post a new video.
 Clicking this image will take you to the 'About' page where you can fill out the form to send me a message or picture and I will receive it in my email inbox.


